Chrome Extension 4 - 백그라운드 변경하기
컨텐츠 페이지의 백그라운드를 변경 하기 위해 아래 코드를 추가 하였다.
chrome.tabs.executeScript({
code: 'document.body.style.backgroundColor="'+num+'"'
});
위의 코드에서 알수 있듯이 서로 통신을 하기 위해서 부수적으로 붙는 코드가 있다는것을
생각 하여야 한다.
popup.js
$(function() {
var count = 0;
$("#add").click(function() {
count ++;
if(count >= 10000) {
count = 9999;
}
$("#count").html("count = " + count);
convertColor(count);
});
$("#sub").click(function() {
count --;
if(count <= 0) {
count = 0;
}
$("#count").html("count = " + count);
convertColor(count);
});
});
function convertColor(num) {
num = num % 8
if(num == 0) num = '#ffffff';
else if(num == 1) num = '#000000';
else if(num == 2) num = '#0000ff';
else if(num == 3) num = '#00ff00';
else if(num == 4) num = '#00ffff';
else if(num == 5) num = '#ff0000';
else if(num == 6) num = '#ff00ff';
else if(num == 7) num = '#ffff00';
chrome.tabs.executeScript({
code: 'document.body.style.backgroundColor="'+num+'"'
});
}
네이버 메인 페이지에서 버튼을 눌러보면 네이버 배경이 변경 되는것을 확인할 수 있다.
2016년 2월 23일 화요일
Chrome Extension 3 - 확장프로그램 실행
Chrome Extension 3 - 확장프로그램 실행


popup.html 파일에 아래 내용 추가한다.
<div id="count">count = 0</div><br>
<button id="add">증가</button>
<button id="sub">감소</button>
<script src="inc/scripts/jquery-2.2.0.min.js"></script>
<script src="inc/scripts/popup.js"></script>
jquery 파일은 해당 파일명을 수정한다.
popup.js 파일을 생성한다.
$(function() {
var count = 0;
$("#add").click(function() {
count ++;
if(count >= 10000) {
count = 9999;
}
$("#count").html("count = " + count);
});
$("#sub").click(function() {
count --;
if(count <= 0) {
count = 0;
}
$("#count").html("count = " + count);
});
});
증가, 감소 버튼을 클릭하면 count의 값이 변경 된다.
여기까진 보통의 html과 같다.
Chrome Extension 2 - 확장프로그램 설정
Chrome Extension 2 - 확장프로그램 설정


작성된 프로그램을 테스트를 하기기 위해선 크롬 브라우져에서 설정을 해야 한다.
크롬 브라우저 url 입력창에 chrome://extensions을 입력하고 엔터를 누르면
확장 프로그램 설정 창으로 이동한다.

우측 상단에 개발자 모드의 체크박스를 체크하고
확장 프로그램을 설치하기 위해서 Load unpacked extension...을 눌러서
manifest.json파일이 있는 폴더를 선택한다.
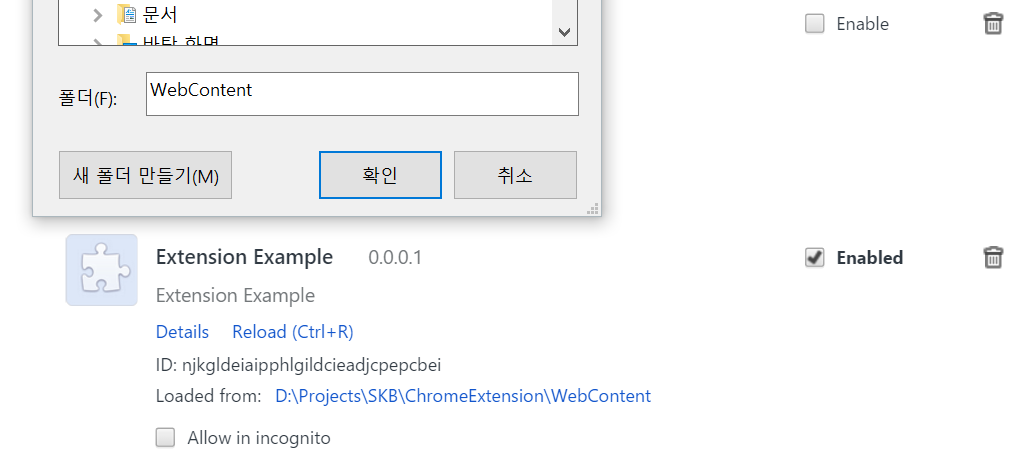
파일을 선택하고 확인을 누르면 위의 그림과 같이 생성된 프로그램의 정보가 보인다.
그러면 작성한 프로그램의 테스트 준비가 완료된것이다.
Chrome Extension 1 - 시작하기.
Chrome Extension 시작하기.
크롬 확장 프로그램은 크롬 브라우저의 기능을 좀더 향상 시켜 줄 수 있다.
크롬 확장 프로그램은 html, javascript, json으로 구성 되어 있다
기본적으로 manifest.json 이라는 파일이 존재 하여야 하며 이 파일은 확장 프로그램의
기본 설정에 대한 정보를 가지고 있다.

크롬 확장 프로그램은 크롬 브라우저의 기능을 좀더 향상 시켜 줄 수 있다.
크롬 확장 프로그램은 html, javascript, json으로 구성 되어 있다
기본적으로 manifest.json 이라는 파일이 존재 하여야 하며 이 파일은 확장 프로그램의
기본 설정에 대한 정보를 가지고 있다.
Manifest File Format
manifest.json은 json 형식으로 작성 되어야 한다.
{
"manifest_version" : 2
, "name" : "Extension Example"
, "version" : "0.0.0.1"
, "description" : "Extension Example"
, "browser_action" : {
"default_icon" : "inc/images/icon.png"
, "default_popup" : "popup.html"
, "default_title" : "Extension Example"
}
, "permissions" : [
"activeTab"
]
}
위의 내용을 보면
manifest_version 는 값이 2이어야 한다(새로운 버젼이 언제 나오면 바뀌겠지만)
name 은 확장프로그램 명.
version 은 확장 프로그램 버전
description 은 확장프로그램 설명
browser_action은 확장 프로그램을 만들기 위한 설정 정보가 있다.
default_icon : 화면에 보여질 아이콘명 기본이 png 형식이지만 다른 이미지 형식도 가능하다
default_popup : 확장 프로그램 시작시 실행될 html 파일(기본파일이라고 생각 하면 된다.)
default_title : 확장프로그램 풍선 내용.
permissions : 확장 프로그램 기능에 관한 접근 제어 관련 정보을 보여준다.
popup.html
<!DOCTYPE html>
<html>
<head>
<title>Chrome Extension</title>
<meta http-equiv="Content-Type" content="text/html; charset=UTF-8" />
<style type="text/css" >
body {
min-width: 400px; /* your desired width */
max-width: 100%;
position: relative;
vertical-align:middle;
}
</style >
</head>
<body>
<h1>Chrome Extension!!!</h1>
</body>
</html>
popup.html은 일반 html이다.

2016년 2월 4일 목요일
jQuery : $(document).ready()
jQuery $(document).ready(handler) 는 아래와 같이 사용하기도 한다.
$().ready(handler) 또는 $(handler)
$().ready(handler) 를 사용하는것은 추천 하지 않는다.(사용하지 말아라)
즉 html 문서가 로딩이 되면 할 작업을 정의 해 주면 된다.
$().ready(handler) 또는 $(handler)
$().ready(handler) 를 사용하는것은 추천 하지 않는다.(사용하지 말아라)
즉 html 문서가 로딩이 되면 할 작업을 정의 해 주면 된다.
피드 구독하기:
글 (Atom)